
Hey Bestie! I’m so excited to share one of my favorite techniques with you! And I think you’ll be shocked at how simple making cross stitch cookies can be! But that’s what I’m all about here, breaking things down into simple, manageable steps anyone can use. Making gorgeous cookies doesn’t have to be extremely complicated or require a pastry arts degree. Anyone can make beautiful and delicious cookies and start at any age. I love the nostalgic vibe of these cross-stitch cookies and there’s literally endless design options. So let’s get into it!
Did you pipe all those lines?!
Every time I make and share one of my cross-stitch cookies, this is the question I receive. And the answer is emphatically NO! Like I said above, I’m all about simple hacks and tricks that anyone can use, so that’s what we’re doing today.
To make my cross stitch cookies, I make an edible grid using the same technique that I use to make my edible lace. It’s actually super simple and makes decorating these cookies really fun!

Cross Stitch Cookies – Supplies
To make it easy, I’ve added an Edible Lace category to my Amazon page where you can find everything HERE, but I’ll break it down below here too.
edible grid material
I use THESE edible, flexible fabric sheets for the best results. They come in different colors, but I usually just use the white and can color them to any shade I want. Note that not all edible icing sheets work the same for making edible lace or grids like we’re doing today. These sheets produce a flexible, edible fabric.

- Edible Fabric Sheet
- Create lace in minutes
Grid Mat for cross stitch cookies
To make these designs, I use THIS silicone mat, which gives me the perfect grid to work with on my cookies. You can easily make round edible grids or any shape you’d like with this one mat. I’ve used it SO many times over and it’s still as good as new!

- Flexible & Sturdy Non-Stick lace mold for cake decorating with beautiful lace grid design, eco-friendly, reusable and durable.
- 3 separate round shapes for cookies
Offset Spatula or palette knife
And finally, you’ll need a tool for making your lace. I use a palette knife from THIS set and it works beautifully. I use these tools for many things in my cookie decorating and treat making. If you already have an offset spatula, you can use that, but I personally think a palette knife works better for this.
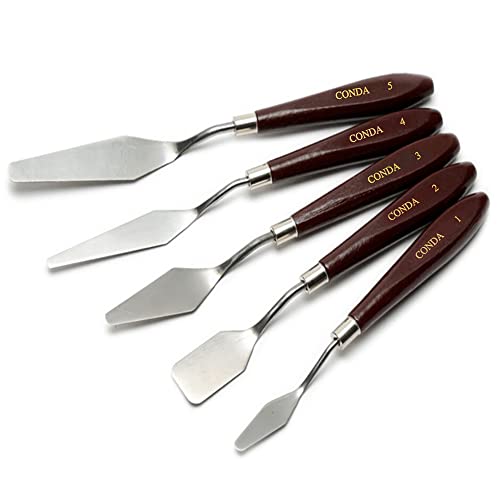
- ARTIST PALETTE KNIFE: 12.75” W x 6” H x 0.5” D, 5 Pieces Set includes 1-each of all 5 Standard Paint knife Styles.Every spatula has one individual package in case the entire safety. This high quality knife has been crafted with the finest stainless blade that resists all wear and corrosion from any media including acrylics
Supplies you likely already have
So you’ve got your edible grid material, a grid mat and a palette knife to make your lace. Beyond these few items, you’ll need some water and parchment paper to make your lace. Sometimes I make my lace on a solid silicone mat, so if you have one of those, you’re golden.
Steps for making the edible Grid
We’ll start by cutting our sheets into smaller pieces and then soaking them in water for about 30 seconds. You don’t want to leave them in there too long because they’ll simply dissolve or you’ll lose too much of the properties of the ingredients. Once they are soft, remove them and place onto your working surface.
Now you’re going to use your palette knife and work the material into a thick liquid. This can take several minutes of working at it to create a smooth texture without any lumps. I usually have a bottle of water nearby to add a few more drops of water as needed if it seems too thick.
Once ready, you’ll be spreading your mixture in a THIN layer across your mat. You really do want a thin later, the depth of the mat, so once you’ve spread it out, go back over it and clean up all the areas.
I prefer to let my edible lace/grid dry overnight. You can use your dehydrator, but over-drying your lace can create other issues later on. My lace dries perfectly if I just let it airdry.
Once your grid is completely dry, it will not feel tacky at all and will easily release from the mat. You’ll simply gently pull it off!
I store my lace/grid in an airtight container, with parchment paper in between if I have different colors. Once dry, your grid is not sticky or tacky at all, so it should not stick to itself.
Applying your edible grid
For cross stitch cookies, I flood my cookie and let it get a good crust or fully dry before adding my grid. Often times, I’ll flood my cookies and make my edible grid the same day and then both the grid and cookies are ready the next day to come together and decorate.
For trimming your grid, I usually find it’s easiest to trim my grid before adding to my cookie. If your cookie cutter is really sharp, sometimes you can simply use it to cut your edible grid to the exact same size and shape. But most commonly, I will trace my shape onto my edible grid using an edible marker and then use my sharp scissors to cut my grid by hand.
For my cross stitch cookies, I use a 2:1 mixture of corn syrup and high-proof alcohol to create a thin glue. I will leave a shiny finish on your flooded icing, which won’t be seen since the grid will cover the entire cookie. I use different methods to add edible lace to my cookies since this mixture can be sticky, but with this technique, we want a good bond. You’ll see me attach my edible grid in the demo video below as well.
Planning your design
This is arguably the trickiest part of making cross stitch cookies! I usually sketch out at least some of my design to anchor my eyes once I start decorating. Cross stitch can be hard to eyeball up close, so I suggest having some kind of guide for your design before starting to pipe. Edible markers work beautifully to create kind of a decorate by color plan! A projector can also be really helpful in planning or mapping your design too!
And I’ll also add…start with simple designs when making cross stitch cookies. If you get too ambitious, it will become too abstract to make out the design. Been there and you can see an example of this HERE! All was going so well until it just wasn’t anymore. But lessons were learned and that’s how art works sometimes. I can guarantee it won’t be the last time I’m not happy with one of my designs!
Cross stitch cookies – icing consistency
Your grid will absolutely provide the structure for your cross stitch cookies, but your consistency is important too. If your icing is too thin, your dots will run together, losing the cross stitch look. A writing consistency, or icing that gives you a good “DQ curl” works great for this technique. Dots will keep their shape without running over. If you’d like to see what that writing consistency looks like in the mixing bowl, you can see it in my royal icing consistency guide.
I use my dehydrator to dry my icing and still do the same when making my cross stitch cookies, they just don’t need much time in there. 5-10 minutes in my dehydrator is all they need to quick set my dots and give them a nice sheen, before letting my icing fully air dry.
How to make Cross stitch cookies – demo video!
Let’s see all this in action, right? You’re going to be amazed at how simple this is!

Are you ready to make your own cross stitch cookies?!
I hope this was helpful and has inspired you to create some of your own! I love this technique and honestly, it looks much more skilled than you actually need. The design options are endless!
If you need any more help, you can find me and thousands of fellow Besties HERE. It’s the happiest corner of the internet where you’ll find endless help, support, inspiration and celebration of beautiful bakes. And I’d LOVE to see your cookies there too!
And if you’re not already receiving my weekly newsletter, you are missing out! Many Besties say it’s their favorite email of the week! You can subscribe below so you never miss out on a new recipe, technique, tutorial, product recommendation and all the free printables! Happy Baking, Bestie!