
Hey Bestie! If you’ve struggled with color bleed, cratering, pitting or other icing issues, the most common culprit is actually the structure of your icing. One of the biggest misconceptions in the cookie world is that all royal icing is the same. Or that the short list of ingredients to make royal icing offers the same results. This could not be further from the truth and the secret behind consistently beautiful royal icing lies in something you can’t see…the structure, at the molecular level.
Beautiful, reliable royal icing starts long before the decorating stage and you may not realize that steps you are or aren’t taking can be sabotaging your results before you even take out your piping bags. So today we’re breaking down the science on how you can create a solid structure to prevent royal icing color bleed and other annoying pitfalls. Read on to learn the steps you can take today to achieve beautiful icing every day.
What causes royal icing color bleed?
Color bleed happens when moisture in the coloring migrates from one area of icing to another. Most commonly, we’ll see darker colors bleeding into neighboring lighter colors during or after the icing has dried. And while there are a million theories on why this occurs, there is one thing that prevents it consistently and that is a strong royal icing structure.
When meringue powder is properly mixed and hydrated, the proteins form a network that helps stabilize the icing as it dries. Think of it like a framework that traps moisture and coloring in place. When that structure is weak, nonexistent, or overloaded moisture can continue moving through the icing long after the surface appears dry. As moisture moves, it carries color pigment with it, which is what causes color bleed.
This is why two decorators can use the exact same coloring and get completely different results. HOW their icing is made and the underlying structure is giving them very different results.
Weak royal icing structure allows color migration
If your royal icing is undermixed or the meringue powder proteins aren’t properly developed, the icing structure will remain weak, even if the icing visually looks fine. A weak structure holds moisture unevenly, dries inconsistently, allows coloring to move more freely and struggles to support well-saturated colors.
And one of the most frustrating things about color bleed is that cookies can look completely fine for hours, but then you wake up to color bleed. That’s because royal icing dries from the outside in. The surface may crust quickly but moisture underneath is still evaporating. And as that internal moisture continues moving during the drying process, coloring can move with it.
This is also why environmental conditions matter so much for cookie decorators. High humidity slows evaporation, extends drying times and increases the amount of moisture moving within the icing.
Royal icing color bleed is a symptom, not the problem
When cookiers experience color bleed, it’s not usually caused by one mistake. It’s the result of multiple, structural weaknesses in their icing. Icing was undermixed, proteins not properly developed, excessive coloring, too much humidity and poor airflow while drying.
But if your icing has a firm foundation, you can avoid royal icing color bleed and other common pitfalls. When that structure is strong, the icing is better able to lock in moisture in place, giving you cleaner lines, more vibrant colors, smoother drying, and consistent, reliable results every time. Cookie decorating is SO much more fun when you don’t even have to worry about color bleed, craters or other issues.
How to create royal icing with the proper structure
So how do you create this strong framework at the molecular level to give you the beautiful results that you want? Let’s cover critical steps when making your royal icing that make all the difference.
Frothing your meringue powder
Your first key step is frothing your meringue powder with your liquids before adding your powdered sugar. Literally whisk your meringue powder, water, corn syrup and flavoring(s) for approximately 30 seconds to create a good froth. Why is this important? Because this hydrates the proteins in your meringue powder, creates a stronger protein network and starts building stability on your icing. This is the first step in building the foundation of a royal icing with a good structure.

Use warm water
Warm water (70-90F) is best for mixing royal icing. Cooler water works fine, but warm water is best. The important thing here is to avoid HOT water, which can weaken the proteins and can destabilize the structure.
Mixing your icing to peaks
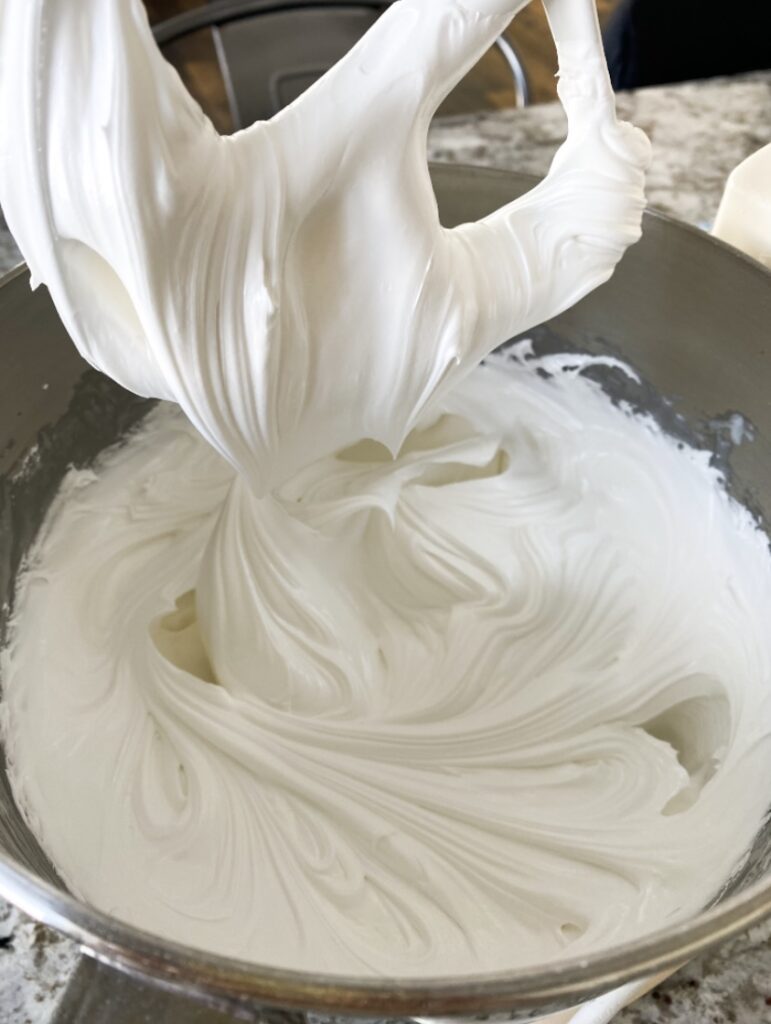
While many dread overmixing their icing, undermixing should be the bigger fear. If icing is only mixed to flood consistency, it does not have the structure it needs to avoid color bleed and other issues. Always fully mix your icing to at least medium, if not stiff, peaks. This will give you a stronger structure and more stable icing that will resist color bleed and other common issues.
include corn syrup
Most cookiers believe corn syrup is used to give better sheen and a softer bite. While those are two perks, corn syrup is also used to give your icing elasticity and slow moisture migration. It’s working at the molecular level to give you the results you want.
ditch the white coloring
Add this topic to the cookie decorating myths I’ll forever be battling. Royal icing that has proper structure does NOT need any white coloring. In fact, including white coloring usually causes more issues. Since it is additional coloring in your icing, it makes achieving vivid colors more difficult, requires you to use more coloring, leading to oversaturation much faster, and then color bleed.
If you’ve been told you need to include white coloring in order to avoid color bleed, that is a sign that their icing doesn’t have the proper structure to begin with, so they are trying to put a band aid on the real problem. Focus on creating icing with the proper structure and leave OUT the white coloring in order to avoid color bleed.
Additional tips for avoiding royal icing color bleed
It all starts with a royal icing with a good structure, so now you’re armed with that knowledge! Next the two additional factors that can contribute to color bleed are oversaturation and drying conditions. Let’s review each.
Oversaturation
You can have the best royal icing structure in the world, but if you oversaturate your icing with color pigment, you’re going to run into issues. Icing that simply has too much pigment in it is not going to dry properly and the excess moisture may lead to color bleed. If your icing has a strong structure to start, oversaturating is actually pretty hard to do, so it’s not nearly as fine of a line as many make it seem.
The more experience you have with your icing, you’ll know how it behaves and what it can tolerate. When it comes to coloring, I add color until I’m a shade or two away from the color I want. I know it will continue to develop and deepen on its own. I don’t wait for it to develop, I simply color and decorate. THIS tutorial includes a lot of guidance and a video on creating vivid colors easily.
Drying conditions
As explained earlier, color bleed can occur when icing dry times are extended, which give moisture transfer a better opportunity. Humid homes can extend or impede icing drying, can lead to color bleed and other issues. Cookiers who live in very humid homes commonly benefit from a small dehumidifier in their cookie area. Small models like THIS can make a world of difference.
This is also why so many cookiers use a dehydrator for quick setting their icing. Again, by quick setting that icing, you’re closing that opportunity for moisture transfer. A dehydrator is one of the simplest ways to avoid color bleed and cratering, while giving your icing a beautiful polished sheen. You can see the difference a dehydrator makes and learn exactly how they are used HERE.
Royal icing recipe
If you’d like to see exactly how I make my royal icing for all my cookies, you’ll find that HERE. Cookie decorating is SO much more fun when you don’t ever have to worry about color bleed, cratering or other pitfalls. Focus on the foundation of your icing, not hacks or the latest new idea. Science is on your side here and will help you create beautiful icing and cookies!
royal icing structure video
To see these structure building steps in action and what the icing looks like once fully mixed, I made a quick video for you! Click HERE or the image below to access the video tutorial.
I hope this was helpful for you in avoiding royal icing color bleed and achieving the stunning results you want! Helping fellow home bakers is all I do every day, so let me know if this was helpful for you! And if you hear of other cookiers struggling, please share this so the circle of love can continue.
If you need any more help, you can find me and thousands of fellow Besties HERE. It’s the happiest corner of the internet where you’ll find endless help, support, inspiration and celebration of beautiful bakes. And I’d LOVE to see your cookies there too!
And if you’re not already receiving my free weekly newsletter, you are missing out! Many Besties say it’s their favorite email of the week! You can subscribe below so you never miss out on a new recipe, technique, tutorial, product recommendation and all the free printables! Happy Baking, Bestie!