Hey Besties! If you decorate sugar cookies, you’re inevitably dealt with royal icing craters…ugh, the dreaded craters! It is incredibly frustrating when you’ve worked so hard on your cookies only for the icing to collapse and ruin the look of your cookies. Well worry no more, I’ve cracked the code! Read on to learn why craters happen and what you can do to avoid them!
Since this is an issue so many cookiers run into, I spent a lot of time researching why this happens and then conducting what I called a ‘crater study’. I worked in research years ago and admittedly, the nerd in me kind of had fun organizing my experiments.
Why do Royal Icing Craters Occur?
In order to know how to prevent royal icing craters, first, we need to understand why they occur. They most commonly occur in small areas, not a larger flooded area. The reason small areas are prone to craters is because of surface tension. In these small areas, the edges dry faster and basically put weight on the middle, causing the icing to collapse, or crater.
Secondly, if you are icing over a flooded area, you should be adding these details once the flood crusts, not after it’s completely dry. If you wait until the initial layer is completely dry, it will pull moisture from the next layer, causing the new icing layer to crater.
These are main reasons cratering occurs, so let’s jump into the crater study and how we can prevent cratering!
Crater STudy
I’ve read and heard of many different theories on how to prevent cratering so I was determined to get to the bottom of it…for the sake of cookiers everywhere.
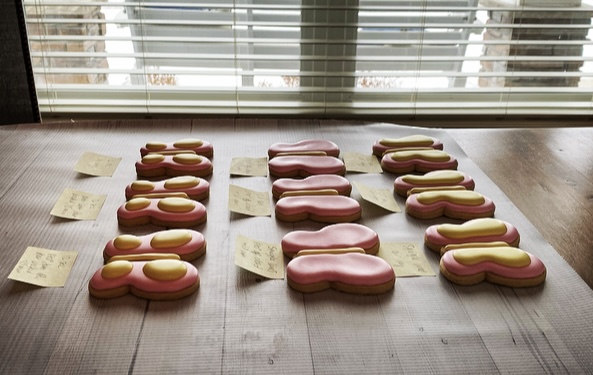
I used a very basic butterfly cookie design as my test subject to study the craters and studied many cookies! Here are the experiments I ran, based on several theories:
- Using a 12 second flood
- Using a 20 second flood
- Adding squiggly lines as a support structure before flooding the new area
Since many theories also involved how the cookie dries, I tested several different quick dry methods as well:
- Airdry
- Using the oven light, door cracked for 15 min
- Heating oven to 170 degrees, turning it off, leaving the door cracked for 15 min
- Heating oven to 170 degrees, turning if off, leaving door shut for 10 min
Crater Study Results
The study was very interesting and yielded some great results! Here are my takeaways:
- The icing consistency did not make a difference. Regardless of whether I used a 12-second or 20-second consistency, the results were the same. So, consistency alone is not the issue.
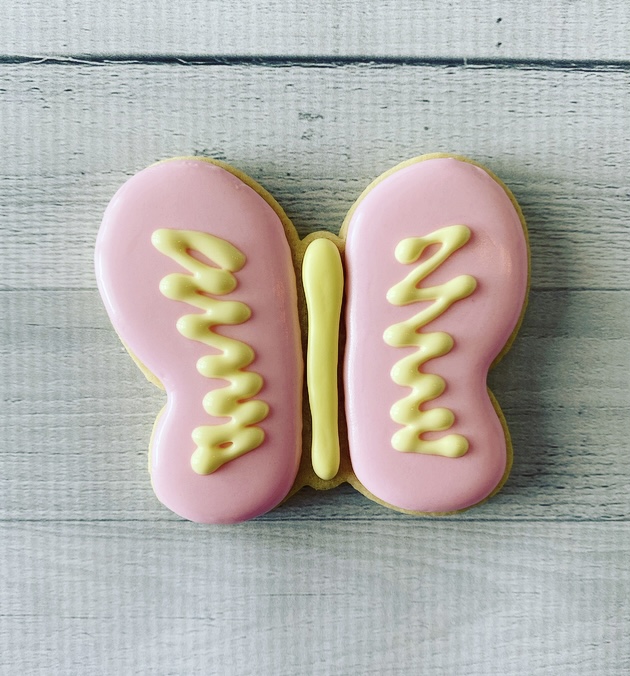
- Adding squiggly lines as a support layer before filling in your area, did help! If you have not heard of this, here is a picture of what I mean:
Studying the quick dry methods was also eye-opening!
- Airdried cookies resulted in the most cratering, which was not surprising
- Putting cookies in the oven just using the oven light as heat did help with cratering, but was not the best method.
- Putting the cookies into an oven that had been heated to 170 with the door closed for 10 min produced the worst results of the study. It was simply too warm and basically melted the icing and led to more cratering.
- Putting the cookies into an oven that had been preheated to 170 with the door CRACKED for 15 min produced the best result, resulting in NO cratering!
Recommended methods to avoid royal Icing Craters
Given everything tested, here are a few recommendations I have to prevent cratering!
- Your timing of adding layers of icing makes a difference! It’s best to add new layers when the existing layer of icing has crusted. If you let the flood layer completely dry, there is a good chance your next layer may crater. This is because the dry layer pulls moisture from the new layer on top of it, causing it to collapse. So, flood your cookie, let it crust or use one the suggested quick dry method below, then add your details on top.
- If you only want to airdry, use the squiggly lines to add a support layer before filling in your area. Even when airdrying, this yielded VERY good results!
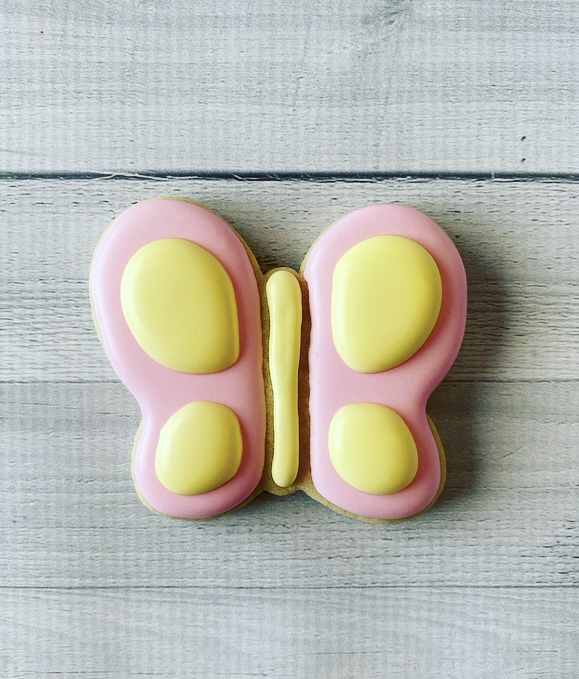
- If you are willing to use your oven to help quick dry your icing, you do not need to add the squiggly lines. Simply decorate your cookie, place it in an oven that was heated to 170 degrees, heat off, door cracked, for 15 min. This method produced the best results, check out this beautiful butterfly!
Now, there is one more method that MANY people recommend but I did not include in this study simply because it requires an additional piece of equipment: a dehydrator. I can tell you, a dehydrator is a game changer when it comes to preventing cratering and also adding shine to your cookies. If you’re ready to make that leap, THIS is the dehydrator I recommend. I have a whole post HERE, all about using a dehydrator and why I use one with every cookie set I make. But in the interest of wanting to help cookiers without having to make an investment, I hope my crater study and results are helpful for you! Armed with these recommendations, royal icing craters should be a thing of the past!
If you found this post helpful, make sure to subscribe so you don’t miss out on future cut out cookie recipes, drop cookie recipes and other valuable content! Happy Baking, Bestie!
When decorating lots of cookies, they are all decorated at different times and will need “cratering help” at different times. The oven will only stay warm for a little while after you turn it off. So would I constantly be turning the oven on and off as my cookies are being decorated? I’m a little confused.
Hi Amy, yes, that is the downfall of this method. It does unfortunately require reheating for ach timepoint. As I noted towards the end of the post, the ideal way to avoid craters and get around the energy waste, a dehydrator is the best way to go. But for those who don’t want to make that investment or don’t make a lot of cookies, this is a reliable method.
Thank you for sharing this information. I appreciate the time you spent and gave to deliberating the results and reporting on them. I will definitely put the best outcomes to use in my baking.
Hi Linda, happy to help! So many cookies struggle with cratering, so I wanted to get to the bottom of it! I hope this helps you produce perfect cookies!
I am relatively new to cookie-ing and suffer from cratering. The theory (which you seem to have proven) that the bottom layer pulls out the moisture makes complete sense to me. However, because I’m still new to this, don’t have a dehydrator and don’t want to be messing with the oven as I am sooooo slow decorating… approximately how crusted over does that flooded layer need to be before adding the decorating? an hour? 3 hours? Apparently, not overnight like I have been doing! LOL. Thanks 🙂
Hi Debbie! If you are only airdrying, I would be sure to use the squiggly lines that I talked about to lay a structural layer down. I would recommend letting your layers crust for 1-2 hours before adding additional layers or details. Keep me posted on how your next set turns out!