Hey Besties! Since sharing my recent posts featuring photo cookies, HERE and HERE, I’m getting all kinds of requests for more guidance and ideas! So, I whipped up another set, made for Mother’s Day and made a quick video for you to show exactly how I make these. There is certainly more than one way to make these cookies, but this is what we have found works best for us and our customers love them! I’m breaking it all down for you so you can easily and successfully learn how to make photo cookies yourself! Let’s go!
The Edible Printing Quest
First thing first, let’s talk about edible image printing. My teenage daughter is the cottage baker in our house, and we’d been wanting to have edible image printing capabilities for a long time. But we were just not interested, at this time, in spending 3k on an Eddie. If you don’t already know, Eddie is an amazing piece of technology that prints directly onto a flooded cookie. Almost everyone who has one loves it, but the 3k price tag deters a lot of people. So, I want on a quest to identify the best edible image printing setup I could for a far more affordable price.
Not gonna lie, I spent what seemed like a billion hours researching different printers, edible inks and icing sheets. See, you can’t just plop edible into any printer, and you can’t convert a printer that has already been used with regular ink, to edible. So, building the best configuration was a mission and through the process we also tested and ruled out products that didn’t give us the results we wanted.
I also had requirements which drove my purchasing decisions. First, it needed to be affordable. I had arbitrarily set a price of $300 that I wanted to stay under for this setup. Pssst…we stayed well under that! Secondly, it needed to produce high-quality, beautiful images. Third, it needed to taste good! And lastly, it needed to be pretty easy to use. Technology and I don’t always see eye-to-eye so user-friendly is always important to me. After all the research and testing, we’ve got a setup we LOVE and are having so much fun with all of our new design options!
Edible Printing Setup
What kind of bestie would I be if I didn’t spill the tea on this edible printing setup?! After all, that’s basically the point of this blog – to help, support and promote other home bakers to achieve wild success. I did the research so you don’t have to and here are the details!
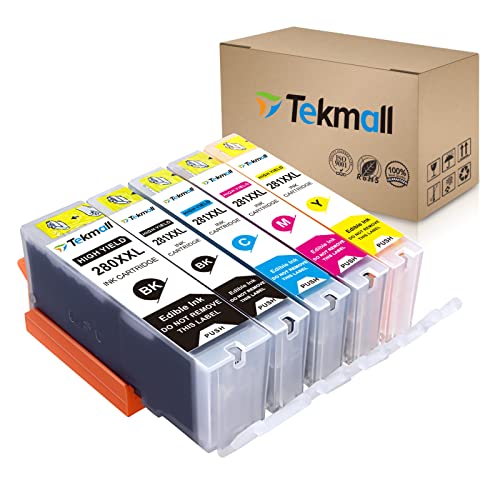
THIS is the edible image printer we use. It was easy to set up and has worked perfectly since day 1. We’ve been very happy with the print quality! And you can’t beat the price!

THIS is the edible ink we use. We tried a different brand first and had very subpar quality results even after many hours of troubleshooting. But THIS ink has been perfection. We’ve achieved vivid colors from day 1 without any manual color adjustments needed.
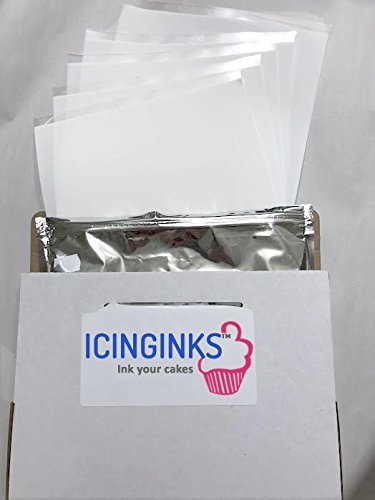
And THESE are the icing sheets we use to print on. They take the edible ink beautifully with wonderful saturation. And they are easy to work with and taste great. They are considerably thicker than rice or wafer paper which is something we wanted for better flavor and quality. Now because I’m always honest with my besties, I will tell you that the icing sheets don’t completely melt. It is still a sheet of icing added to whatever treat you’re making; cookies, cakes, cupcakes, etc. So, if you’re expecting an image that magically becomes part of your icing, an Eddie is really the only way to achieve that. We’ve been very happy with these both in results and flavor and our customers have been too.
This setup cost right around $155 which blew my mind for the quality and designs we’ve been able to achieve. For half of what I had planned to spend, it’s been an incredible investment that paid for itself extremely quickly.
How To Print Edible Images
To print your images, you will need them in electronic file format. I use Canva to format my images and it works perfectly! In today’s example, I’m making some vertical and horizontal photo cookies. So first I measured my cookies and determined what sizes I wanted my images. Then I opened a new design in Canva and went under Elements and then Frames. There are tons of shape options you can add to your page. You can then resize them however you’d like based on what you want for your cookies. It’s then very simple to just drag, drop and edit your images in the frames. Note: I do leave some space at the top and bottom of my page because the icing sheets are technically 10.5″, not 11″. Then I save as a PDF file to my computer before printing. Here is the file I used to print today’s cookies which are made for a Mother’s Day set!
We now have an edible image file ready to print! Here is a snapshot of the printing settings I have saved for printing edible images. We have not needed to make any other manual color adjustments. You can also check the box at the bottom that says “Always Pring with Current Settings” and then these will be defaulted for you.

Also note that once you have your design set up in Canva, you can use your design time and time again, just replacing with new photos or logos. So, we have a set up for 2.5″ circle logos, another sheet of all vertical photo pics, etc. No need to reinvest the wheel every time.
How To Make Photo Cookies
This is where the fun really begins! Once printed, you can cut out your images in a variety of ways; whatever is easiest for you. For our 2.5″ circle images, we use this hole punch which works perfectly. But for these cookies, we use a paper cutter, kitchen sheers or pen blades. I’ve also been told Cricut users can use that to cut their images. And while we have a Cricut, we haven’t embarked on that yet for this.
We now have our images cut and ready to be applied!

I’m guessing you probably already have a cookie recipe you love, but if you need a fantastic, no-chill cutout cookie recipe, THIS is our daily go-to. If you want to have fun with flavors, you have a whole collection available to you HERE. And if you want to know how we make our royal icing, THIS post gives you all the info!
For these photo cookies, I use a thin coat of royal icing as the glue to adhere the image. The easiest way I achieve this is by piping on a flood consistency in the area the photo will be and then use a scraper to thinly spread across the area. You definitely want icing under the entire image before you gently place it on.
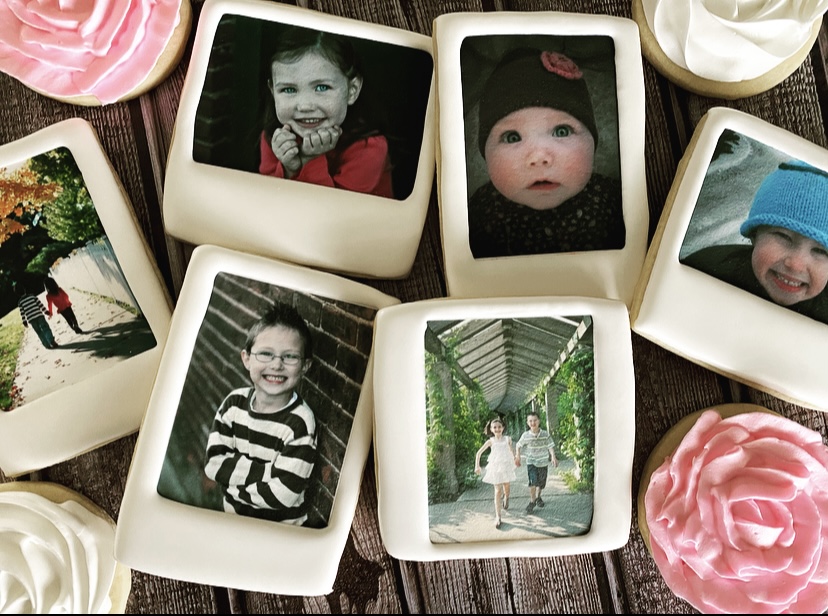
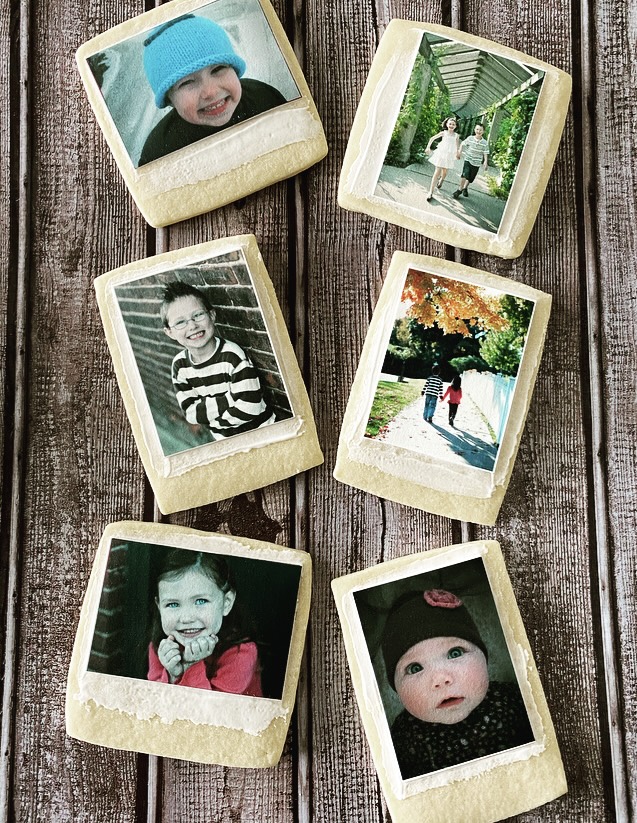
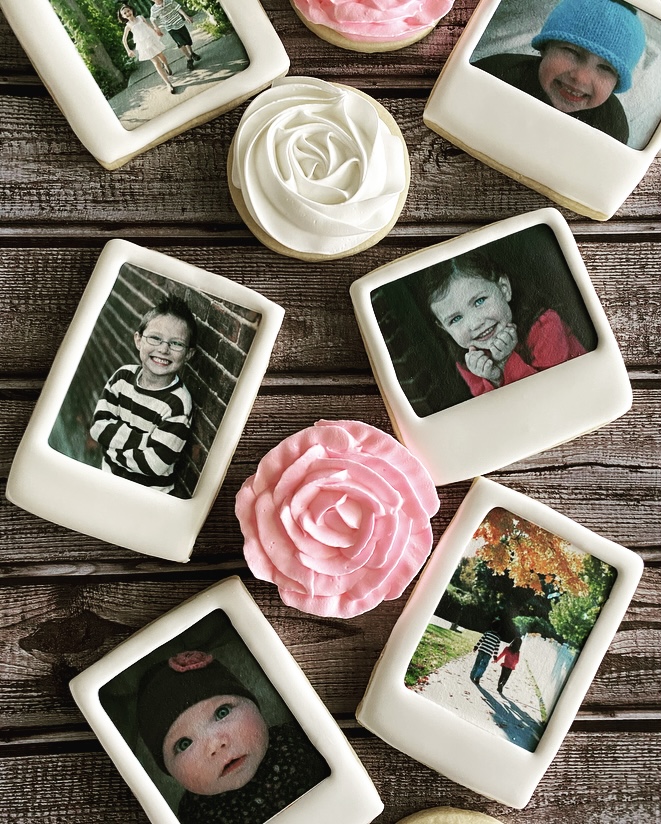
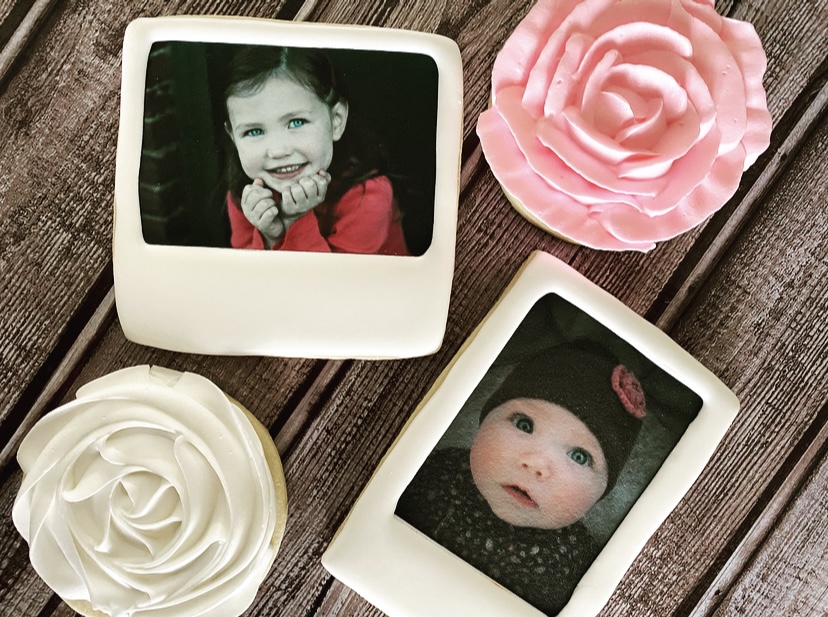
I let the edible image set on the icing for at least a couple of hours before adding the piped frame. But then it really is that simple…pipe around the photo, using a Polaroid picture as inspiration. Then let the cookie completely dry. Here are the cookies drying before adding the piped frame.
Video Demo
To see how I make these cookies in action, I made you a quick video which you can find HERE! Sometimes it’s just easiest to SEE them come together, so I hope this is helpful!
Mother’s Day Photo Cookies
Could there be a more beautiful cookie set for a Mom or Grandma? We added in some pretty flower cookies to perfectly complete a set for Mother’s Day. These photos are of my beautiful kids and that pretty little girl now has her own cottage bakery! While I made the photo cookies, she made the flower cookies.

I hope this post all about how to make photo cookies has inspired you to create some beautiful photo cookies! There are endless occasions to make photo cookies for and they ALWAYS bring a smile.
Lastly, make sure you’ve subscribed to receive our weekly newsletter! Never miss out on a new recipe, technique, product recommendation, Featured Baker and free printables! Happy Baking, Besties!
Ericka, oh my goodness I can across your post on Facebook for pic cookies and WOW what an inspiration you are. Thank you for sharing all of your knowledge.
Julie
Well THANK YOU for your kind words! That means so much to me! I’m always happy to help fellow home bakers!!
do you have to subscribe to canva or is it free to use?
There is a paid version, Canva PRO, but I have only ever used the free version!
I’m so excited, I just ordered everything to start doing printable images on cookies!! Thank you for this information. One question. How long do your ink cartridges tend to last? Thanks again! I think this is going to make a big difference in my business!
Hi! So exciting! I’m so happy this was helpful! How long the cartridges last completely depends on the shape, size and colors of the photos each baker is printing, so there is no exact answer. However, in our experience, we can conservatively print a few hundred photos/logs if we are printing 8-12 per sheet. The printer also has an ink level indicator on the front, so you’ll know when you are starting to get low. Have fun!!!
Hi! I love your cookies and suggestions! I just ordered the printer, icing sheets and ink. So I need to do anything to the printer before loading the edible ink?
Nothing else to do! There is a quick setup guide that you’ll walk through and just install the new edible ink cartridges! Have fun!!
Obsessed. What size it the rectangular cookie and what size photo did u use?
Hi Bonnie! We’re obsessed too! 🤣 The rectangle cutter is from this set: https://amzn.to/3Baxp3d
I don’t have the exact dimensions in front of me for the picture size, but I just baked my cookies and then took a ruler to it to decide exactly how big I wanted my photos to be. You can then size appropriately in Canva.
And once you have your template created in Canva, you can just replace with new pics each time, no need to create a new template!
Have fun!
Please help! I love your post, I bought everything you mentioned, but I can’t get the printer to set up properly. I actually thought there was a problem with the printer so I returned it and bought another one, only to have the same problem! I select the language, install the edible ink cartridges and then nothing happens. It keeps saying I need to install the cartridges that are already installed. Did you have any issues?
Hi Heather! I have not experienced what you are describing…our set up followed the guide exactly. I pulled the guide back out to help you here. Sounds like you’re turning it on, selecting the language and hitting OK. Then you’re removing the tape and orange caps from the ink cartridges and installing them as directed by color, correct? Is the black box indicator showing on the screen above each color after you install them? That indicator should show above each color on the screen when they are properly installed. Let me know if these are the exact steps you’re following. Feel free to email me at [email protected] if that’s easier too!